

Ergo kit
iRES® KIT
Ergo Kit
The purpose of surgical trays is to store the instruments used to insert dental implants. The kit can be carried, sterilized and kept in a horizontal position with the lid closed. All the instruments must be cleaned and sterilized before the first use. The surgical kit and instruments are not sterile at the time of delivery.
Discover our promotions implants + kit
Ergo Kit
#1 Cleaning
1] Dismantle all the compound parts.
2] Rinse abundantly with cold or lukewarm water for 2-5 minutes.
3] Leave the instruments for 10 minutes in an ultrasonic cleaner with a neutral pH. enzymatic detergent diluted in water according to the product instructions.
4] Wash the instruments with water for 3 minutes.
Sterilization
The guidelines for sterilization are listed below. Exceeding these sterilization limits may cause deterioration of the plastic components.
type of cycle (value) | Temperature (°C/F) | exposure | drying time |
|---|---|---|---|
Pre-vacuum | 132 / 270 | 3 minutes | 30 minutes |
Pre-vacuum | 134 / 273 | 18 minutes | 30 minutes |
Gravity | 121 / 250 | 80 minutes | 30 minutes |
Ergo Kit
#2 Drills
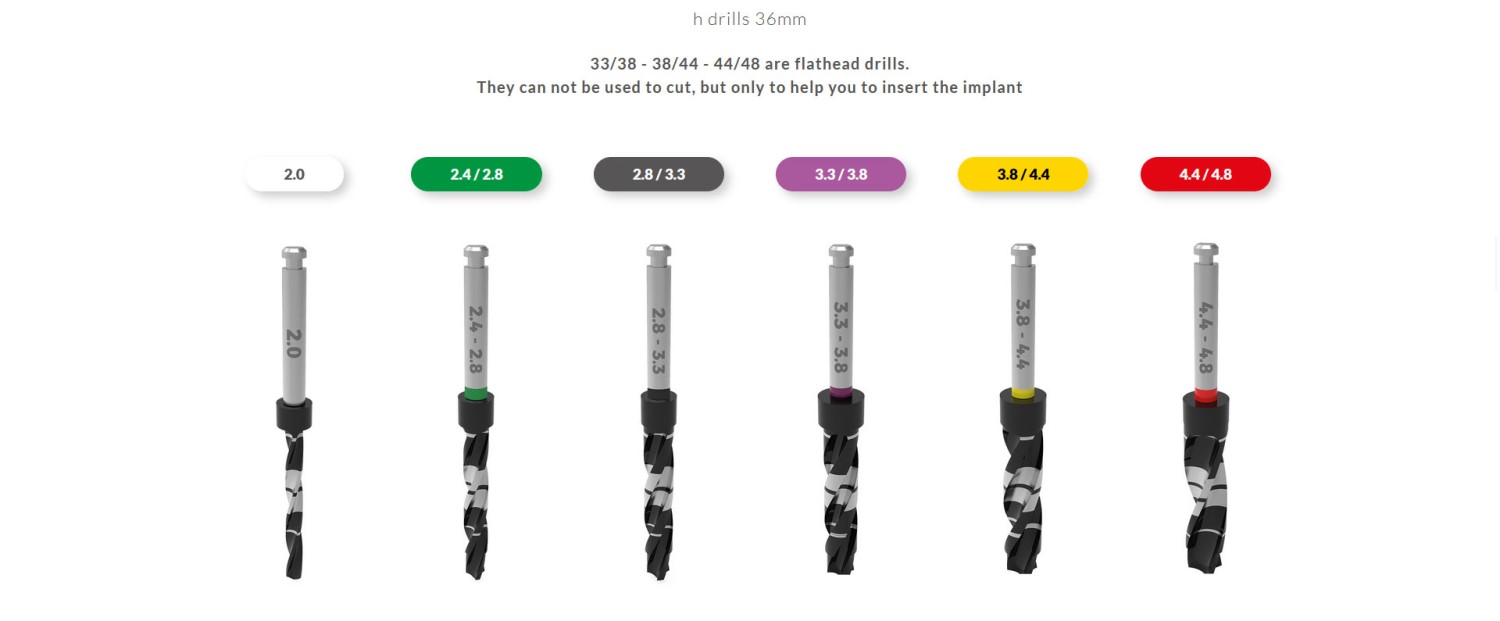
For a proper osteotomy and to maintain the integrity of bone quality, the maximum recommended speed is 800rpm with the direct input of saline solution on the drill, to facilitate cooling. All drills are made of medical stainless steel and subjected to hardening heat treatment. The maximum recommended number of use of the devices is 30 times.
The helical milling cutters have reference laser markings that identify the depth to reach, until 8mm with a thin white line, from 10 to 13mm with a white band in which at half is identified the 11.5mm height, and finally a thin white line for the 16mm. This system gives a clear and intuitive glance of the depth level reached by the drill. 4.5 and 6.5mm are not present to avoid confusion in reading the demarcation lines, and being these measures close to the nerve, it is always recommended to use stop from 4.5 to 6.5mm.
Ergo Kit
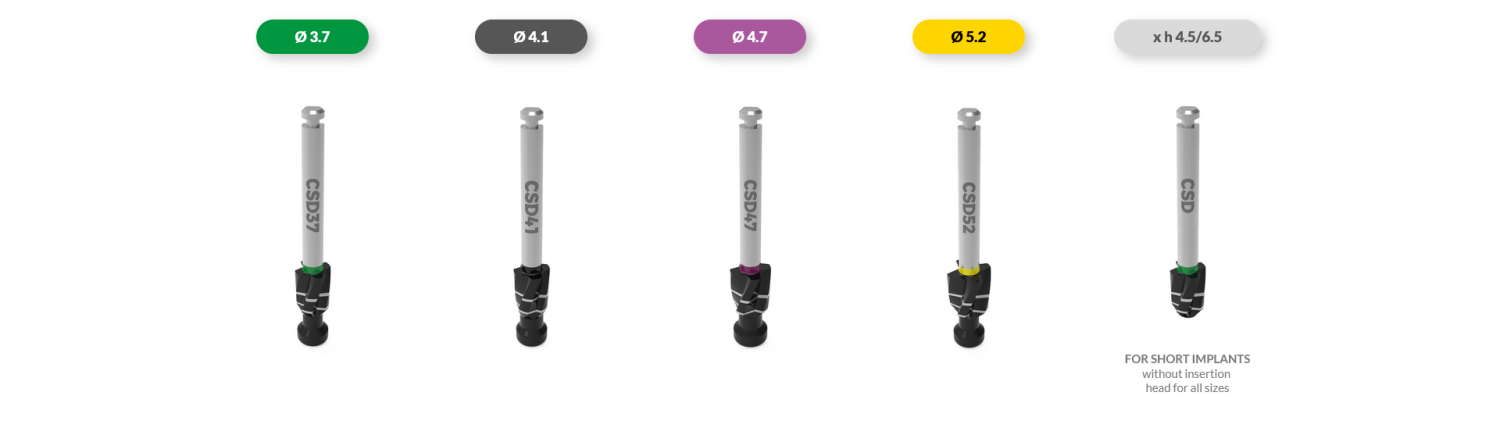
#3 Countersinks
The countersinks are used when there is the need to enlarge the initial part of the hole created to adapt this shape to the neck of the implant to be inserted. The maximum recommended speed is 300rpm with the direct input of saline solution on the drill, to facilitate cooling. The countersink should be used in perfect axis with the osteotomy to avoid its ovalization in the coronal part. The countersinks present two laser markings that identify the depth to be reached based on the bone consistency, at 1.4mm for a “D3“ bone, at 2.8mm for both “D2“ and “D1“bones. Above the marking at 2.8mm, the countersink continues with a cylindrical geometry that does not compromises the osteotomy although more deeply inserted.
Ergo Kit
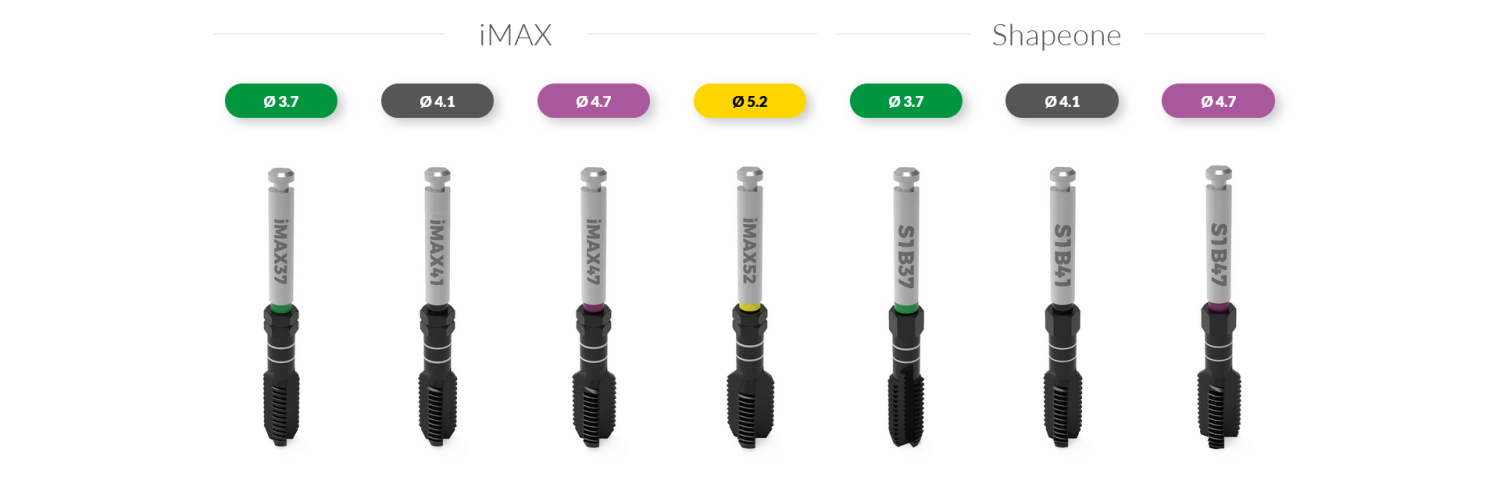
#4 Taps
In very dense bone (Type I) it is recommended to use a tap with the same system profile to insert. The tap is sharper than the implant and it allows to prepare the implantation site with reduced trauma. The maximum recommended speed is 30 rpm with the direct input of saline solution on tap, to facilitate cooling.
Ergo Kit
#5 Stops
The length of the stops ranges from 4.5mm to 13mm and they are available for all the implant lengths. 33/38 – 38/44 – 44/48 are flathead drills. They can not be used to cut, but only to help you to insert the implant.

Ergo kit composition
Code | Description |
|---|---|
DE | drill extender |
LD | lance drill |
D20M | pilot drill Ø 2.0 |
D2428M | drill Ø 2.4|2.8 mm |
D2833M | drill Ø 2.8|3.3 mm |
D3338M | drill Ø 3.3|3.8 mm |
D3844M | drill Ø 3.8|4.4 mm |
D4448M | drill Ø 4.4|4.8 mm |
CSD37 | countersink Ø 3.7 |
CSD41 | countersink Ø 4.1 |
CSD47 | countersink Ø 4.7 |
CSD52 | countersink Ø 5.2 |
TAPS1B37 | tap Ø 3.7 |
TAPS1B41 | tap Ø 4.1 |
TAPS1B47 | tap Ø 4.7 |
Code | Description |
|---|---|
TAPiMAX37 | tap Ø 3.7 |
TAPiMAX41 | tap Ø 4.1 |
TAPiMAX47 | tap Ø 4.7 |
TAPiMAX52 | tap Ø 5.2 |
DS43341M | stop 4.5 |
DS63341M | stop 6.5 |
DS83341M | stop 8 |
DS103341M | stop 10 |
DS113341M | stop 11.5 |
DS133341M | stop 13 |
TWA2 | complete ratchet |
THDDS | short driver |
THDDL | long driver |
HDH25S | short driver hex 2.5 |
HDH25L | long driver hex 2.5 |
